
These sourdough BAGELS are so good.
I haven't had New Jersey bagels since being back in New Jersey (coronavirus really is spoiling all good things) and it was about time I learned how to make this staple.
Now I can't stop making them 🙈
Now I can't stop making them 🙈


This recipe makes 10 small or 8 big bagels.
BAKE TEMP./TIME: 480℉ for 16 min
I N G R E D I E N T S:
1 cup Water (I use room temperature filtered water)
1/2 cup fed Sourdough Starter
2 Tbsp. Sugar
2 tsp. Salt
4 cups Bread Flour
P R E P A R A T I O N:
FEED THE STARTER
To begin, the sourdough starter needs to be fed at least 2 hours before starting the recipe.
This is how I handle the feeding. You might feed your starter differently, but I do it in such a way that I won't have any sourdough discards. None.
My starter lives in a jar in the fridge most of the time and I feed it the day before I plan to eat the bagels. I keep a starter that is roughly 1.5 cups in size. It's a manageable size that can accommodate almost all recipes that use a sourdough starter as most recipes require 1 cup or less. Since I will use 1/2 cup of starter for this recipe, I like to feed my mixture with 1/4 cup of flour and about 1/4 cup of water. This feeding will create a thick sourdough starter that has the consistency of kids toy slime, a bit thicker than cake batter.
After mixing the flour and water in, I will let my starter sit at room temperature until I need it.
IN THE AFTERNOON
It's nice to have fresh bagels for breakfast in the morning. For this reason, I put together the dough in the afternoon/evening on the day before. This overnight rise also helps impatient me to step away from the project to sleep so that the long fermentation can happen undisturbed and unrushed.
To create the bagel dough, I mix all ingredients together, except the flour:
1/2 cup fed Sourdough Starter
1 cup Water (I use room temperature, filtered water)
2 Tbsp. Sugar
2 tsp. Salt
I pop the remaining sourdough starter back into the refrigerator.
When my wet ingredients are nicely combined, I add
4 cups Bread Flour
to it one cup at a time and knead the dough thoroughly for about 5 minutes. If you are hand kneading this dough like I am, adding the last cup of flour might feel all wrong and as if force feeding a dough that already looks way too dry.
If you have a stand mixer (KitchenAid), the mixing of the dough will be much easier and won't take this long.
After lots of kneading, the dough will come together in a dense and heavy ball. To prevent the dough from drying out, but also to avoid the use of single use plastic wrap, I place it in a bowl and cover it with a plate. This way the dough can go through its long fermentation for 12+ hours/overnight. I keep this bowl on the counter in a warm area.
(I sometimes use the proofing function on my oven up to 2 hours if it is too chilly in my kitchen. The proofing function provides a constant 80℉.)
(I sometimes use the proofing function on my oven up to 2 hours if it is too chilly in my kitchen. The proofing function provides a constant 80℉.)
IN THE MORNING
In the morning, I usually find the dough pushing at the bowl cover, ready to escape it.

It has more than doubled in size. I usually test my long fermented doughs for doneness by gently lifting a bit of dough by the edge of the bowl and pulling it towards the middle. I look for aerated strands of gluten. If those are present then the dough has finished the rise. If this should not be the case, I set the dough in a warm place and let it rise some more.

As you can see in this photo, the dough is no longer a dense ball, but fluffy with a lot of tiny bubbles and strands of gluten that looks like string cheese.
I pull the dough from the bowl onto a clean counter and divide it into 10 equal size pieces and then roll them each into a smooth balls. If I like bigger bagels, I divide the batch into 8 pieces.


I don't worry if the hole looks too big, because it will try to spring back to close.
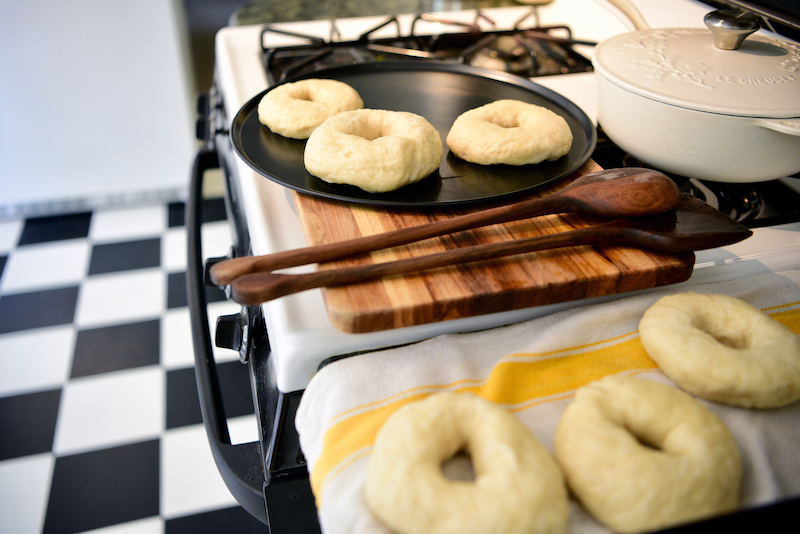
Once shaped, I place the bagels onto a baking sheet and let them rest for at least 40 minutes (I want to see at least some rise and if I have time, the longer I can stretch this second rise the better... up to 2 hours). Another baking sheet upside down works nicely as a non-stick cover. However, I don't stress too much over covering options to prevent the dough from drying at this point because the bagels will get boiled in the next step anyways. 👌

Next, I bring a good size pot of water to a boil and add 1 tablespoon of sugar. I re-stretch the hole inside the bagels if they have started to close. I also prep a drying station for the boiled bagels by folding a clean kitchen towel in half and placing it on the counter close to the pot with the boiling water.

When the water is bubbling, I boil 2-4 bagels at a time for 2 minutes, before flipping them for another 2 minute boil.
During this process I preheat the oven to 480 ℉.
I remove the boiled bagels from the water and let them dry on the kitchen towel while the next batch goes into the water. This is also be a good time to roll the boiled bagels in a bowl with toppings because any seeds will stick nicely to the wet bagels.
Once, all bagels are boiled, dried and potentially decorated with seeds, I place them onto the baking tray to bake for 8 minutes.
 |
| NOT done yet! |
After 8 minutes, I pull the tray from the oven to flip each bagel quickly onto the other side. Back into the oven they go for another 8 minutes.


♡ Nina
No comments :
Post a Comment