Showing posts with label Meatless Monday. Show all posts

Monday, July 14, 2014

Tropical Coconut-Shake

And another DESSERT!  Today’s treat is a vegan milkshake.   This non-dairy version of a classic milk-shake is fruity, decadent and ice cold.  What more could you want in a summer dessert?  The key ingredients to make a milkshake without dairy ice-cream and without cow’s milk are chilled nut-milks and frozen fruit or berries.  In order to keep the total number of ingredients as short as I can while still achieving a creamy ice-cream texture without adding sugar, I opted to use canned coconut milk instead of adding scoops of vegan ice-cream.  What’s your favorite milkshake flavor combination?

VeganMilkshake

Smoothie

1 Banana;  sliced and frozen
2 cups Pineapple;  sliced and frozen
1 Orange;  juiced
1/2 can unsweetened Coconut Milk;  chilled
a dash of Salt


P R E P A R A T I O N S

This recipe is as simple as it gets.  Before, you start, I recommend prepping the banana and pineapple by slicing the fresh fruit into small slices or chunks and then freezing them for a couple of hours.  In order to avoid clumping, spread the banana and pineapple pieces onto a baking sheet.
Next, juice the orange.  Before juicing, I like to firmly press and roll the orange on my cutting board, which makes it then much easier to juice.
Add the coconut milk, orange juice, as well as the frozen banana and pineapple pieces into a high powered blender (or food processor).   Blend until the ingredients combine to forms a uniform mixture without chunks.  Add a dash of salt.  I know this sounds really weird, but just this itty little bit of salt works wonders to balance the fruity and decadent flavors of this ice-cream drink.
Pour into a glass and sip with a wide straw.  Enjoy!
SignatureEnd
       Nina

Monday, July 7, 2014

Watermelon Gazpacho

COLD SUMMER SOUP!  Sweet, spicy, and refreshing, this cooling watermelon soup blends an array of hydrating produce, invigorating spices and fresh herbs.  Tomatoes are usually the main ingredient in this Mediterranean-style chilled soup, but in this version the main component is a juicy seedless watermelon. 


The following recipe serves two.  Please feel free to scale up the portion size as needed.

Soup

1/2 small Seedless Watermelon
about 12 Cherry Tomatoes
1/4 cup fresh Mint leaves;  minced
1 Lemon;  juiced
1/3 English Cucumber
1 tsp. Ginger;  minced
1 tsp. Ground Coriander
dash of Cumin
1 tsp. Jalapeño Pepper;  chopped
a drizzle of olive oil;  to taste


P R E P A R A T I O N S

Wash and clean all fresh produce.
Remove the rind of the watermelon and cut it into cubes.  Also, rough cut the English cucumber. 

Please know there is no need to peel the cucumber.
Finely mince the ginger and the mint.
Combine all the fresh ingredients in a food processor and blend until smooth.  Add the remaining ingredients—lemon juice, coriander, cumin and jalapeño pepper—and pulse to incorporate.  This is a good point to taste the dish to adjust the seasoning to your preference.  Depending on how sweet your watermelon is, and how acidic or sweet your tomatoes are, you may need to add more lemon juice or salt to the gazpacho until you reached a balance you like.  Caution, the jalapeño pepper in the soup will increase their heat with time and might not taste as spicy at this point.
Chill in the refrigerator for about one hour and then ladle into soup bowls.  Add a drizzle of olive oil.
SignatureEnd
       Nina

Monday, June 23, 2014

Zucchini Pasta with Zesty-Mint Pesto

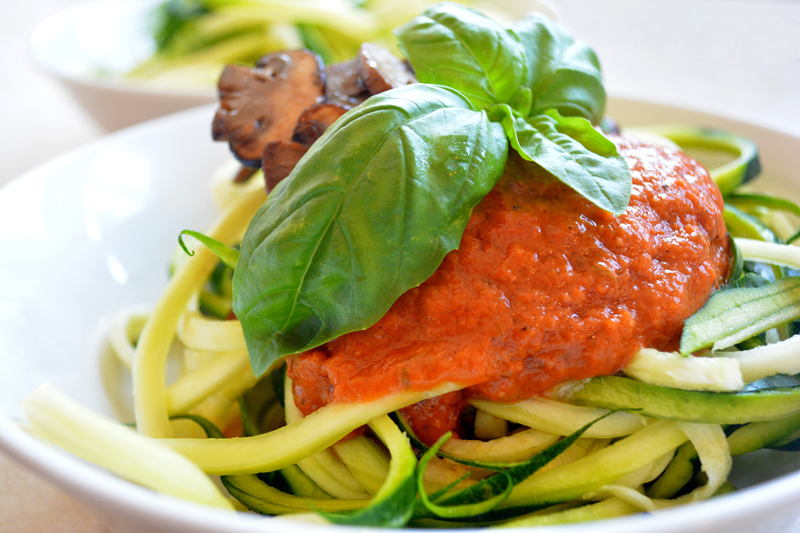
Let’s make a fresh, light and grain-free alternative to ordinary pasta.  A spiralizer is a great tool for anyone who loves pasta, but is looking replace refined carbs with nutrient-rich veggies.  This kitchen gadget creates curlicue spaghetti noodles from zucchini and other veggies.  If you’re a vegetarian, a vegan, or just looking to add more veggies to your diet, this gadget will become your best friend.  This little tool made me fall in love with pasta all over again and I really couldn’t have been bothered to have pasta for quite a long time now.  My husband and I recommend using the GEFU Spirelli Spiral Slicer to shape the zucchini into long spaghetti shapes and then pair it with a simple homemade tomato sauce and freshly made pesto.  I particularly enjoy a good amount of fresh mint, lemon juice and zest in the pesto.  The combination of the marinara and the freshness of the pesto create such a sprightly dressing for the veggie spaghetti—it’s lovely!
ZucchiniPasta

This recipe is entirely gluten and dairy-free.  I encourage you to keep this recipe as raw as you like, but feel free to alter the tomato sauce to your preference and remember that the zucchini pasta also works well sautéed or streamed if you’re looking for a warm dish.  I know how it is: On a hot summer day the last thing you’re looking to eat is a steaming heap of pasta.  But not all summer days are sunny and when you’re looking for something comforting on a miserable, wet day the last thing you want is a SALAD!
Let me know how you like my zesty-mint pesto if you have the chance to try out the recipe.
 
Pasta

3-4 Zucchini

8 oz. Cherry Tomatoes

1 fresh Lemon (2 Tbsp. juice and 1 tsp. zest)

1/2 cup fresh Mint

1/4  cup fresh Basil

1/4 cup fresh Parsley

5 Tbsp. Olive Oil (Blood-Orange Olive Oil)

Salt and Pepper;  to taste


P R E P A R A T I O N

Wash and clean all vegetables.
Shape the zucchinis into pasta using a spiralizer.  I recommend GEFU Spirelli Spiral Slicer, which has been working great for us.  It is a sturdy model and extremely user-friendly.  It basically works like a pencil-sharpener.
After shaping the zucchinis, place them into a platter or bowl of your choice and set them aside.
Zest and juice the lemon.
In a food processor, combine basil, mint, parsley, lemon juice and lemon zest;  process until finely chopped.
With the machine still running, gradually pour the oil through the feed-tube.  Process until smooth.  
Make sure to taste the finished pesto and if necessary adjust the flavor by adding salt, pepper or a spritz more lemon juice.
Options: One, set pesto aside and plate below the pasta when you serve the dish (this less messy version is shown in the picture above).  Or, option two, pour over the zucchini pasta and let the noodles marinate in the pesto.
For the marinara, preheat the oven to 350° F and roast 1/3 of the tomatoes in the the oven (alternatively, you can use sun-dried tomatoes or better yet,  sun dry your own tomatoes and achieve a similar flavor).
Blend the roasted tomatoes in a food-processor and also add the remaining fresh cherry tomatoes.  If you prefer your marinara chunkier, simply cut the tomatoes in half and fold them into the roasted and blended marinara sauce.
When it’s time to eat, heap the zucchini pasta onto a plate and pour the tomato sauce over top.  When eating, you want to twirl your fork to combine both sauces—together they are the perfect dressing!

SignatureEnd
       Nina

Monday, June 16, 2014

Vegan Potato Salad

This delicious potato salad is a wonderful summer dish.  Best of all, it’s as satisfying as any potato salad without the dairy and it has a lot of veggie crunch.  Cherry tomatoes, celery, cucumber and oven-roasted red pepper add a fun twist to the traditional recipe, and a spicy dressing made with vegan mayonnaise, mustard, red wine vinegar and fresh herbs make the perfect bath for the potatoes to soak in.  No eggs or onions needed in this salad—yay!

PotatoSalad

Salad

8 Yukon Gold Potatoes or your preferred kind

1 stalk of Celery;  large dice

1/4 English Cucumber;  diced (sliced and then cut into quarters)

1 Red Bell-Pepper;  cut into strips after roasting

6-8 Cherry Tomatoes;  cut 4 times

1/2 cup fresh Parsley and Basil;  finely chopped

1/2 cup Vegenaise

1 Tbsp. Spicy Brown Mustard

1 Tbsp. Red Wine Vinegar

Salt and Pepper;  to taste


P R E P A R A T I O N

Wash and clean all vegetables.
I recommend starting the recipe by heating the oven to 350° F and heating a medium size pot of water on the stove to a boil.
Next, rub the peppers in oil, place on a baking tray and broil until the skins turn back.  Remove from the oven and let sit for 5 minutes and then peel charred shin away.  Deseed and cut the bell pepper into strips.
Place the potatoes in boiling water and cook until tender (about 20-30 minutes).
Drain the potatoes and let them cool.  I recommend cooking the potatoes the night before to ensure the have the proper texture for cutting and to avoid unnecessary waiting for them to cool while making the salad.
Without peeling, cut the potatoes into ¾-inch cubes and put them in a large mixing bowl.
Cut the vegetables and herbs as described above and add them to the bowl with the potatoes.
In a smaller bowl, mix up the dressing by stirring together the Vegenaise, mustard, vinegar, salt and pepper.
Add the dressing to the vegetables and give a good stir.  Serve right away or set into the refrigerator to cool.  This potato salad tastes good at room temperature or chilled.
SignatureEnd
       Nina

Monday, June 9, 2014

Strawberry Lavender LEMONADE

StrawberryLemonade
Today we are making a delicious...
                                               strawberry
                                                        + lavender
                                         LEMONADE

...and sweeten it with homemade lavender syrup.  This lemonade sounds unnecessarily fancy and complicated, but it’s actually really simple to make.  Strawberries and lavender are both in season right now and these fragrant beauties are everywhere.  With just these two seasonal ingredients, you can take an ordinary refreshment and make it extraordinary.  What a fruity and refreshing drink.  I can’t think of a better way to celebrate the first hot days of summer and strawberry season.  So yummy! 
Let’s go flowers and strawberry picking!  Oh, how I ♡ June for it’s pretty and awesome bounty.

StrawberryLemonade1

The following recipe makes a 16 oz. glass of lemonade and enough lavender syrup for several drinks. 


Lemonade

1 Lemon;  juiced

5 fresh Strawberries

5 sprigs of fresh Lavender;  flowers

1 1/2 cups Sugar

Water


P R E P A R A T I O N S

The first step in this recipe is to prepare a lavender simple syrup. 
Rinse the lavender flowers and remove the stems.
In a small pot, heat 1 cup of water.  When the water starts boiling, stir the sugar into it and let the mixture come back to a boil while stirring continuously.  At this point, reduce the heat, drop the lavender flowers into the sugary water and let everything simmer for about 5 minutes.  Allow the syrup to cool and then strain out the lavender.
Meanwhile, wash and clean the strawberries and also juice the lemon.
Combine 3 tablespoons of lavender syrup with the lemon juice and the berries into a bowl before processing with an immersion blender.
When the mixture is blended smoothly, transfer it into a 16oz. glass, fill the rest of the glass with cold water and stir everything together.
Grab your favorite straw and enjoy!
SignatureEnd
       Nina

Watermelon Smoothie
   You might also like...
   Meatless Monday:  Mint Watermelon Smoothie

Monday, June 2, 2014

Creamy Asparagus Soup

When in doubt, MAKE SOUP!  Sometimes I feel a bit uninspired and I can't think of a combination of food from my kitchen that seems to work together as a meal.  What am I going to do with all these lovely asparagus?  Soup!  And it's going to be healthy, hearty and creamy all at once 


AsparagusSoup

DSC_0156

Soup

1 bunch of Asparagus

4oz. Crimini Mushroom

1 Tbsp. Earth Balance Vegan Butter

1.5 Tbsp. Flour

2 cups of homemade Vegetable stock

2 Tbsp. Vegan Sour Cream

1/2 cup Coconut Milk

1 Tbsp. Red Wine Vinegar

fresh Rosemary

Salt and Pepper;  to taste


P R E P A R A T I O N S

Wash and clean the asparagus and then break off the tough ends (discard or freeze to make stock)
Cut off the tips and set them aside because they are added to the soup towards the very end.
Thinly chop the asparagus and mushrooms.
Melt the butter in a medium size sauté pan before adding first the mushrooms and then the asparagus.  Sauté for about 10 minutes over medium heat.  Test the vegetables for doneness and then sprinkle in 1/2 of the flour while constantly stirring.  Continue cooking over the lowest possible heat, stirring frequently, another 5 to 8 minutes.
Slowly add the vegetable stock while stirring constantly.  Heat to a boil and then turn down to a simmer.  After about 5 minutes, sprinkle in the remaining tablespoon of flour, mixing well.  Cook another 8 to 10 minutes, stirring frequently.
Puree the soup with the vegan sour cream and the coconut milk, either with a hand-held immersion blender, or bit-by-bit in a food processor or blender.  Finally, season the smoothly blended mix with pepper and correct any last bit of taste imbalances with a little sprinkle of salt.
Steam or sauté the reserved asparagus tips until they are tender.   If necessary, gently heat (but don't boil) the soup, ladle it into your favorite soup bowl and add the asparagus tips.  Serve immediately and enjoy.

EXTRA:  If you happen to have about 50 minutes and you’re interested in simple & sensible vegetarian cooking, I’d recommend the following lecture/book-tour talk given by the lovely Molly Katzen.  I myself am a strict vegan and some I don't like or agree with some of what she talks about, but I respect Mollie Katzen for the huge contribution she made to advocating plant-based food starting by the publication of the Moosewood Cookbook in the 1970s.  Katzen holds many culinary honors for her work and advocacy, including the title "one of the best-selling cookbook authors of all time" by the New York Times.  What I like most about Katzen's cookbooks is that the dishes always turn out wonderfully and the recipes are simple to make with ingredients you will most definitely already have in your kitchen.  Her soups especially!  At one point in this lecture Katzen explains that she is always trying to make a recipe as simple as she can because “if a recipe has too many ingredients and if that ingredient list is one or two ingredients to long, that you will likely turn the page and not make the recipe.”  I find this to be so true. 


SignatureEnd
        Nina

Monday, May 26, 2014

Summer Rolls

These vegetable spring rolls are perfectly light & fresh for lunch, dinner or a fun appetizer!  They are a great way to enjoy salad by adding a bit of novelty and bite size manageability by rolling the vegetables into rice paper wraps.  It’s also easy to make once you’re used to working with the wrappers. 

SpringRoll

SpringRoll1


INGREDIENTS:  

2 Tbsp. Olive Oil

2 sprigs of fresh Rosemary; chopped

Salt Brine Mix: 1/2 tsp. Salt, 1 Tbsp. warm Water


Optional Toppings: 

Cherry Tomatoes; sliced, 

Cherry Peppers; sliced,

Olives

Hot Pepper Flakes etc.


PREPARATIONN: 

I use a medium size bowl to mix the day 1 ingredients.  Instead of my hands I use a chopstick to stir everything i


3 Romaine Lettuce leaves;  chopped

1 Carrot;  julienned

3 radishes;  sliced

3 inches of English Cucumber;  julienned

1/2 Avocado;  sliced

Parsley;  finely chopped

Rice Paper Wraps

Salt and Pepper


Vibaigrette

1 Tbsp. Soy Sauce

1 Tbsp. Red Wine Vinegar

1 Tbsp. Honey

2 Tbsp. Coconut Oil

1/2 Lime;  juiced


P R E P A R A T I O N S

Wash and clean all fresh produce.
Thinly julienne all radishes, the English cucumber and the carrot.
Shred the lettuce leaves and spring onions into a thin chiffonade.
Finely chop the parsley and then mix all produce into a large mixing bowl.  Sprinkle with salt and pepper.
Working with one wrap at a time, soak the rice paper in warm water for 5 seconds or until pliable.
Lay out onto a dry cutting board or work surface and a place small amount of the mixture onto one side of the rice paper wrapper.  Core and thinly slice the avocado.  Then, arrange 2-3 slices of avocado on top of the salad.  Fold the smaller edge over until all the ingredients are covered.  At this point, we prefer to also fold in the ends of the wrap to keep the salad from slipping out.
Finally, roll up the rest of the rice paper as tightly as possible without tearing.
To prepare the dipping sauce of this recipe, simply combine soy sauce, red wine vinegar, honey, coconut oil and lime juice.  Depending on you ingredients, you may have to adjust the ratio of acidity by adding a little bit more honey or vinegar.
Slice the wraps in half on a small bias, plate and enjoy. 
SignatureEnd
       ♡ Nina

Monday, May 19, 2014

Mushroom + Ginger Potstickers

For this weeks recipe, I'm making pan-fried vegetable and ginger pot stickers. This recipe is a favorite in our home and a great appetizer for a party or potluck.  
These potstickers retain all the wonderful fresh flavors of the vegetables and have a satisfying crispy outer shell.  
I hope you have the chance to make and enjoy these dumplings as much as we do!  Please feel free to let me know in the comments if you made a batch of your own.  I would love to hear what you think.

Dumplings


INGREDIENTS: 

8 oz Crimini Mushrooms;  finely chopped


1/2 cup Carrots, finely chopped

1/2 cup Snap Peas; finely chopped

2 cups Savoy Cabbage, finely shredded

1 Tbsp. fresh Ginger; grated

2-3 Tbsp. Cooking Oil

fresh Rosemary & Thyme;  finely minced

fresh Wonton Wrappers

Salt and Pepper;  to taste

Soy Sauce


PREPARATIONS: 

The first step in this recipe is to rough chop mushrooms, cabbage, snap peas and carrots.  

Also, finely mince rosemary and thyme.

Next, grate the ginger (I don't bother peeling the ginger before grating it... it still looks and tastes the same either way). 

Heat 1 tablespoon of coconut oil in a medium sauté pan and then add the vegetables in the following order:  ginger, mushrooms, asparagus, peas and then cabbage.  Make sure to brown the mushrooms before proceeding on to the other vegetables.

After adding the cabbage, add two Tbsp. of water and herbs.  Cover the pan and let the mixture simmer on low heat until the cabbage has wilted.  Season with salt and pepper.
Set out your wonton wrappers on a large cutting board or clean dry counter.  This recipe will make about 12 pot stickers.

Time to construct the dumplings.  Spoon a small amount of the mixture onto each wonton wrapper.  

Lightly wet one edge, fold and pinch the edges together.  Crimp the pinched edge with a fork.  You could try folding your wonton wrappers in many different ways, but this is the one we enjoy.

Clean the sauté pan and then heat 2 Tbsp. of oil on medium heat.  Brown wontons on both sides and then set on paper towels to absorb excess oils.

Plate with some soy sauce.  Enjoy!

       ♡ Nina 


Tabbouleh 
  You might also like...
  Meatless Monday: Sprouted Tabbouleh Salad

Monday, May 5, 2014

Sprouted Tabbouleh Salad

This recipe is a raw salad, with sprouted ingredients, it’s vegan, gluten-free and best of all, you will need quite a few bouquets of fresh herbs.  I love preparing dishes with a lot of fresh and aromatic herbs.  Sadly herbs are only once in a while the central focus of a recipe, but most often, they are just a last-minute addition or a finishing step.  This is why I'm so excited about Tabbouleh because it is basically a chopped herb salad.  And don’t worry, purchasing bunches of herbs is actually quite inexpensive and if you’re lucky enough to have an herb garden, you will love this recipe even more. 

Tabbouleh

Tabbouleh is a well known signature Lebanese salad or side dish.  It’s really refreshing because it’s made with finely chopped parsley and mint, bulgur wheat, tomato, cucumber, onion and fresh lemon juice.  Our recipe is not an authentic version of Tabbouleh, but the flavors are still very close to Tabbouleh salads we had at Lebanese restaurants.   This recipe substitutes sprouted quinoa for cooked bulgur wheat in order to make this recipe gluten-free and raw.  We also substituted a mix of freshly grown sprouts and chopped scallions for the onion and garlic the traditional recipe calls for.  I chose to make these substitution because I suffer an adverse reaction when consuming meals with onions or garlic, but I still wanted to preserve the flavor and bite the onions adds to the Tabbouleh.   I urge anyone to give this alternative version a try because it really showcases all the fragrances and flavors of the beautiful herbs in it that could so often get lost when mixed with a lot of onion.

Tabbouleh2
 
Tabbouleh1

Now, let’s grab a large bowl and start chopping and mixing up this salad!

Tabbouleh

2 bunches of fresh Flat-Leaf or Curly Parsley;  very finely chopped

1 large Tomato;  diced into small cubes

3 stalks of fresh Mint;  very finely shopped

1/2 English Cucumber;  diced into small cubes

1/2 cup fresh Sprouts

3 Tbsp. Quinoa (you could also use Bulgur wheat)

1/2 Lemon;  juiced

1/2 cup Pine Nuts;  toasted

Salt and Pepper;  to taste


P R E P A R A T I O N S

Thoroughly wash and clean all the vegetables in cold water.  It is also important to rinse the quinoa several times before soaking and sprouting it to remove impurities and to make the grain less cloudy.  For best result, sprout the quinoa in cold water overnight or a couple of hours before preparing this salad.  For this recipe, we are only using three tablespoon of the gain, because the the amount of quinoa generally swells three times in size.
Heat a frying pan with no oil or butter and then toast the pine nuts for only a few minutes.  Remove the pan from the heat, but don’t remove the nuts from the pan just yet.  While you busy yourself chopping the rest of the ingredients, the residual heat in the pan will work its magic on our little pine nuts and give their underside a gentle browning we’re looking for.  The correct toasting off the pine nuts will add a tremendous amount of flavor and texture to the Tabbouleh.

Finely chop the parsley, the mint and the other vegetables according to the recommendations above.

Combine all the ingredients into a large mixing bowl, squeeze the fresh lemon juice over it and season the dish with salt and pepper.  There are many variations on this recipe and some call for a lot more lemon juice in order to balance the acids correctly.  This all depends on the season and the freshness of your produce.  We found, if you add ripe, juicy tomatoes and cucumber, the juice of 1/2 a lemon is sufficient.  Please feel free to add more lemon juice if you like, but remember you can always add, but you can never take away.

Also, please feel free to chop up some bell pepper or radish and add them to the salad.

I love serving Tabbouleh in a large bowl and spoon it on romaine lettuce leaves with a little hummus.  This makes such crunchy lettuce burritos and it’s really good!  I love having it as a salad, or eat it like salsa with chips.  Leftovers of this salad makes a wonderful side or topping for a variety of savory breakfast and lunch dishes. 
Enjoy!
SignatureEnd
        Nina

SproutSandwich2   You might also like...
   Meatless Monday: Veggie Sprout Sandwiches

Monday, April 28, 2014

Mint Watermelon Smoothie

My favorite way to have watermelon EVER.  It’s not messy, it’s easy to make and beautifully paired with complimenting ingredients, a perfect pick me up after a long day of work or school.  This watermelon smoothie is an awesome refresher on hot, sunny days, made simply with fresh watermelon, lime juice and mint leaves.  Due to the absence of dairy, you might think this looks more like lemonade than a smoothie, but the watermelon’s unique texture when blended makes this drink much more substantial and satiating than lemonade.  I'm especially fond of the mint in this recipe.

Watermelon Smoothie

Smoothie  

3 cups of cubed Watermelon

1/2 Lime;  juiced

2-3 leaves of fresh Mint

a pinch of Salt
 

P R E P A R A T I O N S

This recipe is as simple as it gets.  Before, you start, I recommend washing your fresh produce.

Cut slices of watermelon into cubes until you have the needed amount.

Before juicing, I like to firmly press and roll the lime on my cutting board, which makes it then easier to juice.
Juice the lime.  

Blend all ingredients together with an immersion blender (or food processor) until it forms a uniform mixture without chunks.

Pour into a glass and sip with a wide straw.  You could add 1 or 2 ice cubes into the glass to make this smoothie extra chill, but if you are using a refrigerated watermelon, the ice cubes are not needed.
SignatureEnd
        Nina

Watermelon Salad
  You might also like...
  Meatless Monday:  Savory Watermelon Salad

Monday, April 21, 2014

Quinoa Mushroom Risotto

Quinoa makes a great alternative to Arborio rice, the grain generally used in risotto.  My husband and I have been working with quinoa for a while and we're quite smitten with it.  This tiny grain is often considered a super-food because it's a complete protein, it's gluten free, high in magnesium, vitamin B-2, iron and it's a good source of fiber.  While I appreciate quinoa’s high nutritional value, I love to switch to this grain for it's interesting texture.  Bored of rice and pasta?  Then the fluffy, sprouted texture of quinoa might be just the thing for you.  Let’s get started with the recipe and let’s also add mushrooms and fresh snap peas into our risotto—yum!

QuinoaRisotto

Now, to the process of making the perfect risotto.  It only takes about 20 to 30 minutes to prepare this dish, but it does require the chef's undivided attention.  It's not tricky or complicated, nor does it require any special culinary skills.  The risotto just wants to be babied and stirred at all times.  Risotto is not exciting to cook, but if you can handle the monotony, you'll end up with a great rice dish... I mean quinoa. 
The next picture shows the main ingredients you will need. 
Btw, how awesome does the black Hawaiian salt look?  I can tell you it's amazing and it has a wonderful flavor because it tastes mild and smooth.

Risotto
Risotto1
QuinoaRisotto1

 
Risotto

4 Tbsp. Coconut Oil/ olive oil


7 oz. Crimini Mushrooms;  cleaned and sliced

Snap Peas

1 cup White Organic Quinoa

5 cups Vegetable Stock;  preferably homemade

1/3 cup White Wine

1/4 Red Onion (optional)

1/4 cup Vegan Sour Cream

Parsley, Rosemary and Thyme;  finely minced

Salt and Pepper;  to taste (we used black Hawaiian salt)


P R E P A R A T I O N S

Wash, clean and cut all vegetables, also thoroughly soak and rinse the quinoa in cold water.  This step is essential to get a great tasting quinoa. 


Also, rinse the herbs, pull their leaves from the stems and mince finely.

Heat the coconut oil in a large skillet  and add the sliced mushrooms and sauté until they are golden and soft.  Remove them from the skillet and set them aside.

If you would like to add onions to the dish, this is the perfect time to repeat the last step and sauté the red onion until they are soft and translucent.

When all the veggies are removed from the pan, add the drained quinoa into the same pan to give the grains a good toasting.  The remaining oils and juices from cooking the mushrooms and onions are an excellent flavor enhancer to the risotto.  Stir the quinoa for about 3 minutes, or until the quinoa is coated with oil and slightly toasted.

Now, the first addition is white wine.  Lower the heat, add the wine and continue stirring until the quinoa absorbs all the liquid. This will happen quickly and you want to ensure it does so evenly.
Once the wine is absorbed, add the vegetable broth 1/2 cup at a time.  Stir every time you add more liquid.  Allow the quinoa to absorb and almost dry out between the additions of broth. 

Keep stirring in the broth 1/2 cup at a time until the quinoa is creamy and the quinoa germ has burst.  This process should take about 20 minutes.

Taste the quinoa to determine doneness and to make sure its at the consistency you prefer and also salt and pepper the dish.

Once the last addition of broth is almost absorbed, stir in the sour cream and the fresh herbs, remove pan from the heat, cover with a lid and let stand for 2 minutes to help develop the creamy texture. The finished risotto should be creamy and moist and should hold its shape without running or flattening.

Use the time in which the quinoa rests to give the snap peas a quick sauté in butter and deglaze with white wine.

Finally, plate the quinoa onto a deep dish plate and top with the vegetables.

If you are entertaining guests and you don't want to spend so much time fussing over the risotto, I recommend par-cooking the quinoa.  Prepare the risotto according to the instruction but set it aside to cool before adding the final two 1/2 cups of broth.  In this manner, you can finish and serve a beautifully and freshly made risotto in less them 5 minutes.

SignatureEnd
        Nina


oatmeal3
  You might also like…
  Meatless Monday:  Banana-Nut Oatmeal